Microfluidics is a rapidly evolving field that requires precise control of fluid movement through various types of tubing. In many applications, interfacing peristaltic and rigid microfluidic tubing is essential to combine the flexibility and pumping efficiency of peristaltic systems with the structural stability of rigid tubing. This article will guide you through the process of easily and effectively interfacing these two types of tubing.
TABLE DES MATIÈRES
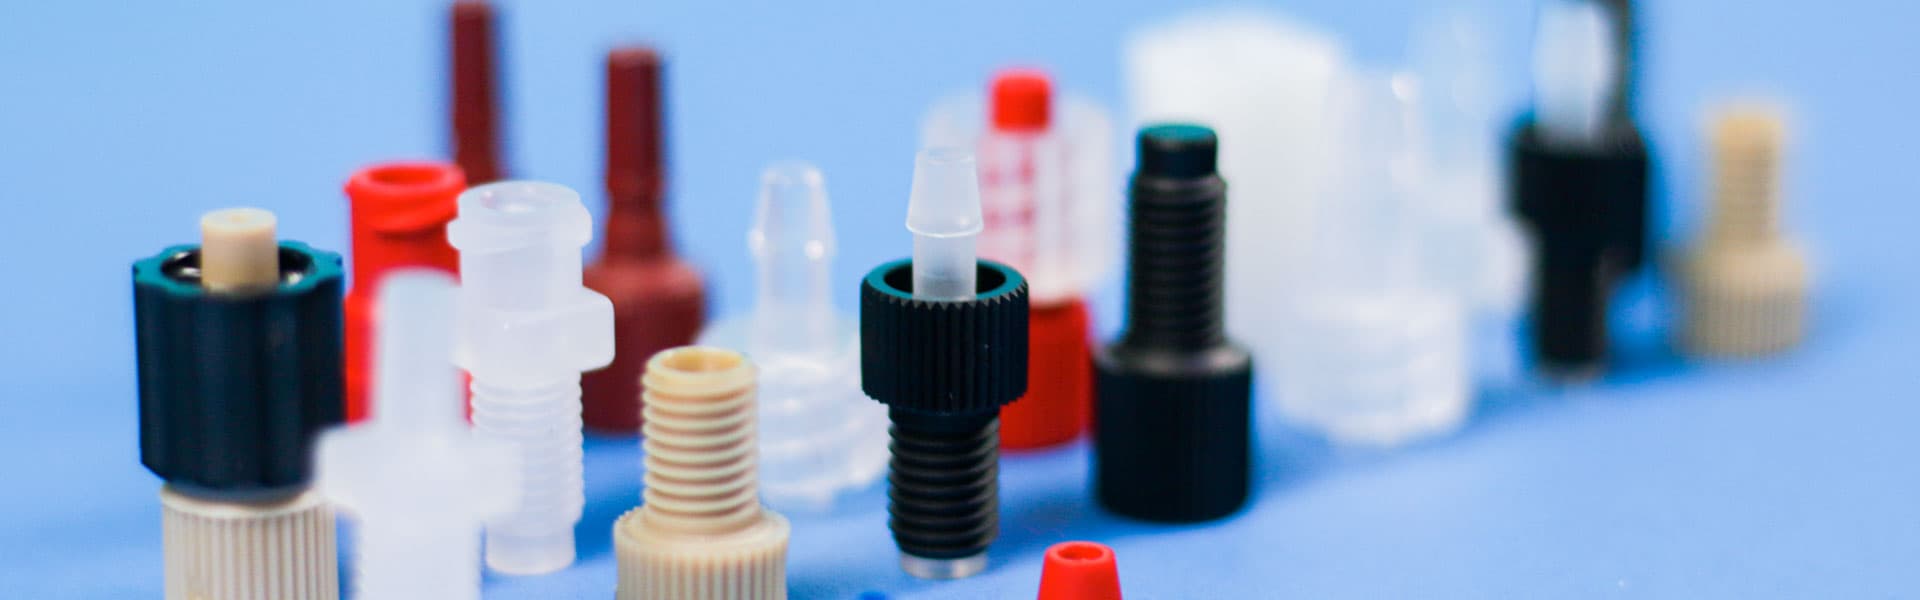
Understanding Peristaltic and Rigid Tubing
Peristaltic Tubing
- Fabriqués à partir de matériaux flexibles tels que le silicone ou le Tygon :
- Tube en silicone : Reconnu pour sa flexibilité, sa biocompatibilité et sa résistance à une large gamme de températures et de produits chimiques, souvent utilisé dans les applications médicales, pharmaceutiques et de transformation alimentaire.
- Tube Tygon : Un nom de marque pour une famille de produits de tubes polymères flexibles, offrant une excellente clarté, flexibilité et résistance chimique, conçu pour manipuler divers fluides et gaz, et adapté à une utilisation en laboratoire et industrielle.
- Used in peristaltic pumps, which operate by compressing the tubing to push fluids through.
- Idéal pour les applications nécessitant une manipulation délicate des fluides sensibles :
- Échantillons biologiques : parfaits pour le transport de cellules vivantes, de protéines et d'autres matériaux biologiques délicats sans causer de dommages.
- Applications chimiques : convient au transfert de produits chimiques corrosifs et de solvants.
Tube microfluidique rigide
- Composé de matériaux comme le verre, l'acier inoxydable ou les plastiques rigides :
- Tube en verre : Offre une excellente résistance chimique et une transparence permettant une surveillance visuelle du débit de fluide, souvent utilisé dans les instruments analytiques de haute précision et les applications optiques.
- Tube en acier inoxydable : Reconnu pour sa robustesse, sa durabilité et sa résistance aux températures et pressions élevées, couramment utilisé dans les environnements industriels, notamment les industries pétrochimique, pharmaceutique et agroalimentaire.
- Tube en plastique rigide (par exemple, PTFE, PEEK) : Tube très polyvalent, connu pour son inertie chimique, son faible frottement et sa résistance aux températures élevées, largement utilisé dans les applications nécessitant une excellente résistance chimique et des propriétés antiadhésives.
- Offre des voies précises et stables pour le mouvement du fluide :
- Précision : Le tube rigide assure des diamètres internes constants et des surfaces lisses, ce qui est essentiel pour maintenir des débits précis et minimiser la dispersion du fluide.
- Stabilité : Le tube rigide est idéal pour les applications à haute pression, car il peut supporter des contraintes mécaniques importantes sans se déformer.
- Application Range: Rigid microfluidic tubing is suitable for use in chemical processing, and any application where maintaining exact fluidic pathways is crucial for performance and accuracy.

Steps to Interface Peristaltic and Rigid Tubing
During your microfluidic experiments, particularly when working with a peristaltic pump, you may encounter difficulties when trying to connect peristaltic/soft-walled tubing to rigid tubing. Below, you can find the steps to easily interface those two types of tubing.
- Select Compatible Tubing Sizes:
- Ensure the inner diameters (ID) of both peristaltic and rigid tubing match or are compatible.
- To ease the interfacing between these two types of tubes, use tubing adapters if necessary to bridge size differences. For example, the Peristaltic Tubing Adapter for 1/16″ OD PTFE Tubing can be used to connect peristaltic tubing (with an inner diameter ranging from 1.2 mm to 3.8 mm) to standard 1/16" OD rigid tubing, ensuring a leak-free connection with minimal internal volume possible.
- Utilisez des connecteurs appropriés :
- Employ fittings and connectors designed for microfluidic applications, such as flangeless fittings, barbed fittings, ferrules, Luer locks, or quick-connect couplings.
- Ensure connectors provide a secure, leak-proof seal.
- Prepare the Tubing Ends:
- Cut both peristaltic and rigid tubing ends cleanly and evenly using a tubing cutter or a sharp blade.
- Smooth any rough edges on rigid tubing to prevent damage to the flexible tubing and ensure a tight fit.
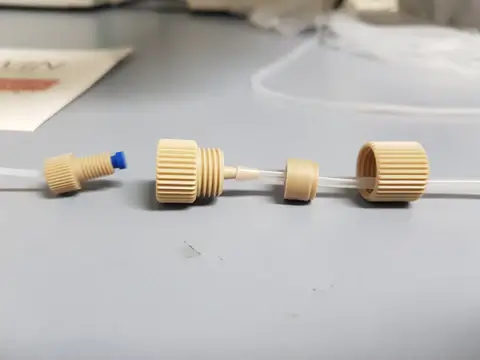
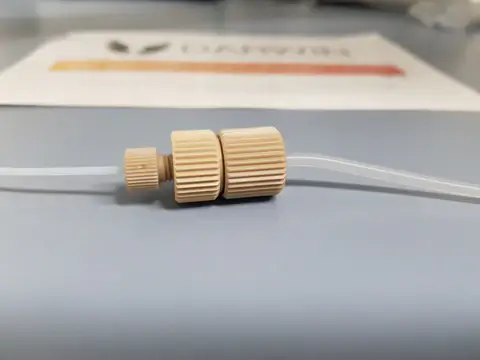
- Assemblage :
- Attach the rigid tubing to the fitting and ferrule (as can be seen on the left of the exploded view of the peristaltic tubing adapter used below).
- Slide the peristaltic tubing over the main conical connector, ensuring a snug fit.
- Vissez les pièces assemblées ensemble jusqu'à ce qu'elles soient bien fixées.
- Ensure it is tight enough to prevent leaks but not so tight as to damage the tubing.
- Test de l'interface :
- Once assembled, test the connection by running fluid through the system.
- Vérifier l'absence de fuites et s'assurer qu'il n'y a pas de chute de pression excessive à travers l'interface.
- If leaks are detected, tighten the connections or apply additional sealing mechanisms such as PTFE tape.
Case of a Thin Peristaltic Tubing
When working with very small fluid volumes and delicate peristaltic pumps, you may encounter challenges when attempting to connect very thin peristaltic/soft-walled tubing to rigid tubing. The flexibility and fragility of the thin-walled tubing can make it difficult to create a secure and leak-proof connection with the more stable rigid tubing. However, using a needle can be an effective solution to bridge this gap and ensure a reliable interface. Below, you can find the detailed steps to easily and effectively interface these two types of tubing using a needle (stainless steel or other compatible material).
- Select Compatible Tubing Sizes (as explained above).
- Sélectionnez la Bonne Taille d'Aiguille :
- Choose a needle with an outer diameter (OD) that matches the inner diameter (ID) of the peristaltic tubing (check the syringe needle gauge table). Always use a needle with a larger outer diameter than the inner diameter of your tubing!
- Assurez-vous que l'aiguille est fabriquée dans un matériau compatible avec vos fluides et les matériaux de votre tube.
- Prepare the Tubing Ends:
- Cut both peristaltic and rigid tubing ends cleanly and evenly using a tubing cutter or a sharp blade.
- Smooth any rough edges on rigid tubing to prevent damage to the flexible tubing and ensure a tight fit.
- Insérer l'aiguille :
- Carefully insert the needle into the end of the peristaltic tubing. The fit should be snug but not overly tight to avoid damaging the tubing.
- Push the needle in until it is securely seated inside the peristaltic tubing, ensuring no gaps are present.
- Connect to Rigid Tubing:
- Insert the free end of the needle into the rigid tubing or use an appropriate connector (such as a Luer lock or barbed fitting) to secure the connection.
- If using a connector, ensure it is designed to hold the needle and rigid tubing securely without leaks.
- Sécuriser la connexion :
- If necessary, apply PTFE tape around the needle where it meets the peristaltic tubing to ensure a leak-proof seal.
- Use additional connectors or fittings to secure the needle and rigid tubing connection as needed.
- Test de l'interface :
- Faites circuler le fluide à travers le système assemblé pour tester la connexion.
- Vérifier l'absence de fuites et s'assurer qu'il n'y a pas de chute de pression excessive à travers l'interface.
- Si des fuites sont détectées, resserrez les raccords ou appliquez des mécanismes d'étanchéité supplémentaires si nécessaire.
Bonnes pratiques et conseils
💡 Sélection cohérente des matériaux : Choisissez des matériaux de tube chimiquement compatibles avec vos fluides pour éviter la dégradation et les fuites.
💡 Considérations relatives à la température : Soyez attentif aux plages de température pour les deux types de tube. Des températures élevées peuvent rendre le tube flexible trop mou et provoquer l'expansion ou la contraction du tube rigide, entraînant potentiellement des fuites.
💡 Entretien régulier : Inspectez régulièrement les connexions pour détecter tout signe d'usure, en particulier dans les applications à haute pression ou à usage intensif, et remplacez le tube ou les connecteurs présentant des signes de détérioration.
💡 Solutions personnalisées : Pour les systèmes complexes, envisagez des adaptateurs ou des raccords fabriqués sur mesure, conçus spécifiquement pour votre application. Ceux-ci peuvent offrir une meilleure fiabilité et des performances supérieures à celles des composants standards.
Conclusion
Interfacing peristaltic and rigid microfluidic tubing can be straightforward if approached methodically. By selecting compatible sizes, using the right connectors, and ensuring secure and leak-proof assembly, you can achieve a reliable and efficient fluidic interface. Whether you are working in a laboratory or an industrial setting, these steps will help you integrate different types of tubing for optimal performance.
Restez à l'écoute pour plus d'aperçus, de tutoriels et d'applications pratiques dans nos prochains articles. D'ici là, bon pompage !
📧 If you have any questions or feedback, please feel free to contact us at contact@darwin-microfluidics.com.