When working with peristaltic pumps, correctly mounting the tubing on the pump head is crucial for optimal performance and system accuracy. Ensuring the tubing is properly installed enhances the efficiency of your pumping system and helps prevent potential issues such as leaks or inaccuracies. One key factor in this process is occlusion, which refers to how tightly the tubing is pressed by the pump’s rollers. In this post, we’ll guide you through the steps for mounting the tubing on a peristaltic pump head and explain how to properly adjust occlusion.
How to Mount Tubing on a Peristaltic Pump Head?
In peristaltic pumps, ensuring a proper connection between the tubing and the pump head is critical for maintaining accurate flow rates and preventing problems like leaks, improper occlusion, or uneven fluid transfer. A well-mounted tubing setup guarantees consistent performance and prolongs the lifespan of both the tubing and the pump.
While some installation steps may vary depending on the pump or pump head model, the following guide outlines the key steps for mounting tubing on a Longer peristaltic pump with a DG series pump head.

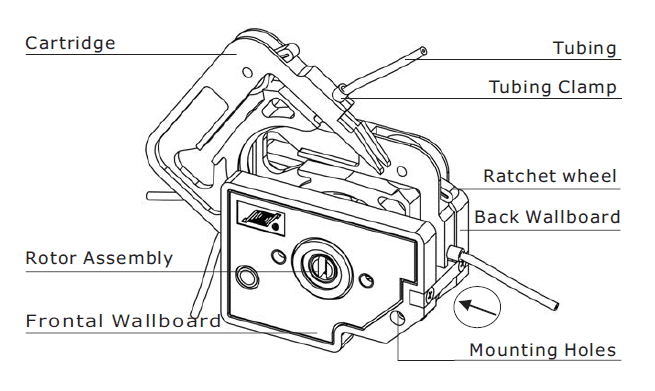
The schematic representation above provides a clear visual reference for the key components of a DG series peristaltic pump head, which is essential for following the mounting steps. It identifies important parts such as the cartridge, tubing, and tubing clamp, which play a critical role in securing the tubing in place. Additionally, the ratchet wheel allows for easy adjustments to the tubing compression, ensuring a snug and proper fit.
Steps To Mount Tubing on a Peristaltic Pump Head
Follow these steps to achieve a correct tubing connection and ensure your pump functions efficiently:
- Select the right tubing:
Choose a tubing compatible with both the DG series pump head and the fluid being pumped. Consider material, diameter, and flexibility. Ensure the wall thickness matches the gap between the rollers and housing to avoid occlusion issues.
- Prepare the Tubing:
Cut the tubing to the required length with a clean, straight edge to prevent kinks or uneven compression. Adjust the stops to approximately 74 mm apart for optimal performance.

- Turn Off the Pump:
Ensure the pump drive is turned off before starting the installation to avoid accidents or damage.
- Load the Tubing into the Cartridge:
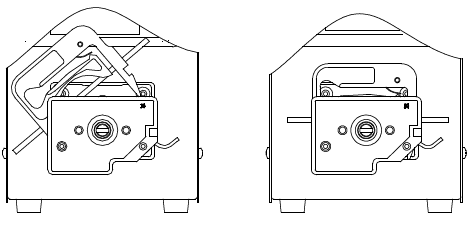
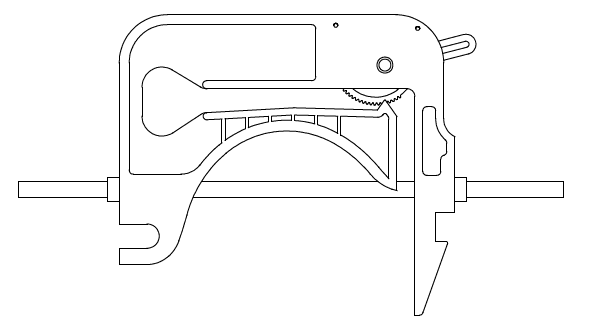
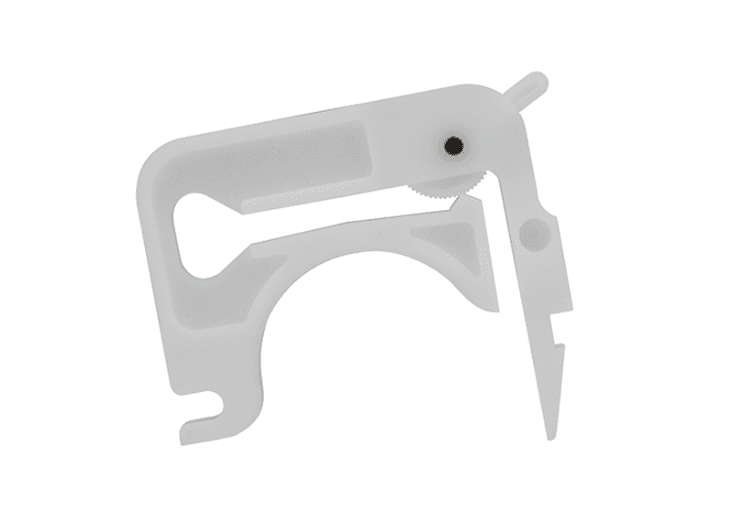
Insert the tubing into the cartridge slots on both sides as indicated in the video below.
- Insert the Cartridge into the Pump Head:
Place the cartridge onto the pump head, ensuring it seats correctly. The tubing should fit snugly without twists or kinks. Below is a video showing how to properly load the tubing into the cartridge and insert the cartridge into the pump head.
- Adjust the Occlusion:
Rotate the ratchet wheel to the lowest position to maximize occlusion. Start the pump at a low speed and adjust the ratchet wheel until proper fluid flow is achieved. Avoid over-tightening to prevent excessive occlusion.
- Perform a Test Run:
Before running the pump at full speed, test it to ensure the tubing functions correctly and there are no signs of occlusion. Monitor the flow rate and adjust as needed.
- Preventative Measures:
If the pump will be idle for an extended period, release the tubing from the rollers to prevent unnecessary compression and extend tubing life.
- Regular Maintenance:
Periodically inspect the tubing for wear or damage. Check every 50 hours of use and replace as needed. Keep the pump head dry and free of chemical solvents.

Common Issues Caused by Improper Tubing Installation in Peristaltic Pumps
If the tubing is not properly mounted in the pump head of a peristaltic pump, several issues can arise, including:
- Leaks: Poorly seated tubing can cause fluid leaks at the inlet or outlet, leading to fluid loss.
- Inaccurate Flow Rates: Misaligned tubing leads to inconsistent compression by the rollers, leading to incorrect flow rates.
- Tubing Slippage: Loose tubing may slip, causing irregular or no fluid delivery.
- Excessive Wear and Tear: Misalignment increases tubing wear and shortens its lifespan.
- Cavitation or Air Entrapment: Air pockets from improper tubing can cause cavitation and reduce pump efficiency.
- Pulsation or Flow Instability: Twisted or loose tubing creates pulsation or unstable flow patterns.
- Pump Head Damage: Incorrect tubing alignment strains the rollers and mechanical components, potentially damaging the pump head.
- Occlusion: Pinched tubing can block fluid flow, causing pressure buildup.
What is Occlusion?
One of the most crucial aspects of mounting tubing on a peristaltic pump head is properly adjusting the occlusion of the tubing. Too much or too little occlusion can lead to performance issues, such as excessive tubing wear, reduced flow, or leakage.
In peristaltic pumps, occlusion refers to the degree of compression applied to the tubing by the pump’s rollers. This compression creates a seal that prevents the fluid from flowing backward. The level of occlusion is crucial to the pump’s performance, as it directly impacts the flow rate and the longevity of the tubing. If the tubing is overly compressed (over-occlusion), it may wear out quickly due to excessive stress, while insufficient compression (under-occlusion) can result in leaks, backflow, and inconsistent fluid delivery.
An occlusion problem refers to the partial or complete blockage of the tubing, which can disrupt fluid flow and place additional strain on the pump. This issue arises when the tubing is excessively compressed or pinched. Therefore, achieving the correct occlusion is essential for maintaining the pump’s efficiency and extending the life of the tubing.
What Factors Contribute to Occlusion Problems?
Several factors contribute to occlusion problems, including incorrect tubing size and the condition of the tubing itself.
- Incorrect Tubing Size: Tubing that is too large or too small for the pump head can lead to improper compression and flow issues.
- Tubing Condition: Worn or damaged tubing can also cause occlusion. Cracks, kinks, or wear can disrupt the flow of the fluid.
- Pump Head Pressure: Excessive pressure from the pump head can lead to over-compression of the tubing.

How to Adjust Occlusion?
In most advanced peristaltic pumps, occlusion can be manually adjusted or automatically regulated by feedback systems. Below are the key methods to adjust and monitor occlusion.
- Manual Adjustment: Many peristaltic pumps allow for manual control of roller pressure. This adjustment is often achieved using a ratchet wheel or similar mechanism, which controls the gap between the rollers and the pump head. This gives the flexibility to fine-tune the occlusion level according to the tubing material and the fluid being pumped.
- Feedback-Controlled Systems: In more sophisticated systems, occlusion can be automatically adjusted based on sensor feedback from flow rate or pressure changes.
- Regular Calibration: Since tubing can wear over time, it’s essential to regularly inspect and calibrate the pump’s occlusion settings. Adjusting occlusion periodically ensures efficient pumping, and extends the life of the tubing.
Adjusting Occlusion for DG Pump Heads
For DG peristaltic pump heads, when using Longer brand peristaltic pumps, adjusting occlusion is straightforward but critical. The pump’s occlusion setting is controlled on each cartridge by a ratchet wheel, which allows precise tuning of the occlusion gap based on tubing wall thickness and material.
Here’s how to adjust the occlusion for non-standard tubing:
- Initial Setup: Start by mounting the tubing into the pump head. Set the ratchet wheel to its lowest possible position where the pump can still effectively pump fluid. This maximizes occlusion by pressing the rollers firmly against the tubing.
- Bleed Test: Place the inlet of the tubing into water, and blow gently through the outlet. If you observe air bubbles escaping, it means the occlusion is not yet sufficient to form a complete seal.
- Fine-Tuning: Gradually adjust the ratchet wheel upwards, one notch at a time, while repeating the bleed test. Once there are no more bubbles visible, the occlusion is correctly set. If you continue to see bubbles even when the ratchet wheel is at its highest position, the tubing wall is likely too thin for the pump’s specification, indicating it falls outside the applicable range.
For DG pump heads, some models offer a color-coded guide to assist in setting the ratchet wheel according to tubing material and size. The following table shows the recommended ratchet wheel positions based on tubing inner diameter (ID) and wall thickness, where position 1 is the lowest position and position 7 is the highest one. The pump head accepts the tubing with a wall thickness of 0.8–1 mm and an ID of 0.13–3.17 mm.
| Tubing Size (ID) | Material | Position | Cartridge Position Color Code | |
| DG6 | DG10 | |||
| 0.5 | Silicone | Red | White | Yellow: Position 1 White: Position 2 Black: Position 3 Red: Position 4 Blue: Position 5 Green: Position 6 Purple: Position 7 |
| 1 | ||||
| 2 | Black | Yellow | ||
| 2.4 | White | |||
| 3 | Yellow | |||
| 0.13-3.17 | PVC PharMed | Green | Blue | |
| FPM | Blue | Blue | ||
Tips for Avoiding Occlusion Problems
💡 Optimize pump occlusion: Adjust the degree of compression applied to the tubing by the pump’s rollers until the pump operates smoothly without leaks or air bubbles.
💡 Use the right tubing: Always select tubing that matches the pump’s specifications.
💡 Regularly inspect tubing: Check for signs of wear, kinks, or damage.
💡 Adjust pump settings: Ensure that the pump’s pressure and speed settings are suitable for the tubing and fluid being used.
Conclusion
Properly mounting the tubing on a peristaltic pump head is essential for maintaining the accuracy, efficiency, and longevity of your pumping system. Ensuring the correct level of occlusion is equally important, as it impacts the flow rate and prevents issues like excessive wear or leaks. By following the right setup procedures and paying attention to occlusion, you can optimize the performance of your peristaltic pump and ensure reliable, consistent operation.
Stay tuned for more tips on optimizing your peristaltic pump systems, troubleshooting common issues, and enhancing your fluid handling techniques! Until then, keep your pumps running smoothly and remember: To keep a steady pace, put your tube in place! 🚀
📧 If you have any questions or feedback, please feel free to contact us at contact@darwin-microfluidics.com.


