Microfluidics is a rapidly evolving field that requires precise control of fluid movement through various types of tubing. In many applications, interfacing peristaltic and rigid microfluidic tubing is essential to combine the flexibility and pumping efficiency of peristaltic systems with the structural stability of rigid tubing. This article will guide you through the process of easily and effectively interfacing these two types of tubing.
TABLE OF CONTENTS
Understanding Peristaltic and Rigid Tubing
Peristaltic Tubing
- Made of flexible materials such as silicone or Tygon:
- Silicone Tubing: Known for its flexibility, biocompatibility, and resistance to a wide range of temperatures and chemicals, often used in medical, pharmaceutical, and food processing applications.
- Tygon Tubing: A brand name for a family of flexible polymer tubing products, offering excellent clarity, flexibility, and chemical resistance, designed to handle various fluids and gases, and suitable for laboratory and industrial use.
- Used in peristaltic pumps, which operate by compressing the tubing to push fluids through.
- Ideal for applications requiring gentle handling of sensitive fluids:
- Biological Samples: perfect for transporting live cells, proteins, and other delicate biological materials without causing damage.
- Chemical Applications: suitable for transferring corrosive chemicals and solvents.
Rigid Microfluidic Tubing
- Made of materials like glass, stainless steel, or rigid plastics:
- Glass Tubing: Provides excellent chemical resistance and transparency, allowing for visual monitoring of fluid flow, often used in high-precision analytical instruments and optical applications.
- Stainless Steel Tubing: Known for its strength, durability, and resistance to high temperatures and pressures, commonly used in industrial settings, including petrochemical, pharmaceutical, and food processing industries.
- Rigid Plastic (e.g., PTFE, PEEK) Tubing: Highly versatile tubing known for its non-reactivity, low friction, and high-temperature resistance, widely used in applications requiring excellent chemical resistance and non-stick properties.
- Provides precise, stable pathways for fluid movement:
- Accuracy: Rigid tubing ensures consistent internal diameters and smooth surfaces, which are critical for maintaining precise flow rates and minimizing fluid dispersion.
- Stability: Rigid tubing is ideal for high-pressure applications, as it can withstand significant mechanical stress without deforming.
- Application Range: Rigid microfluidic tubing is suitable for use in chemical processing, and any application where maintaining exact fluidic pathways is crucial for performance and accuracy.
Steps to Interface Peristaltic and Rigid Tubing
During your microfluidic experiments, particularly when working with a peristaltic pump, you may encounter difficulties when trying to connect peristaltic/soft-walled tubing to rigid tubing. Below, you can find the steps to easily interface those two types of tubing.
- Select Compatible Tubing Sizes:
- Ensure the inner diameters (ID) of both peristaltic and rigid tubing match or are compatible.
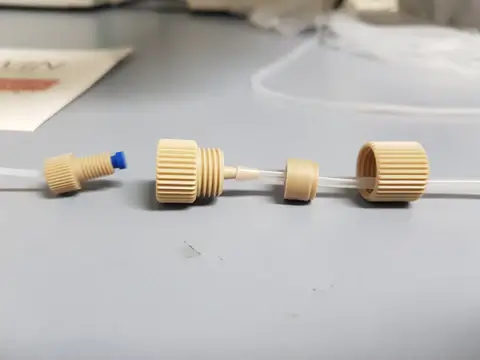
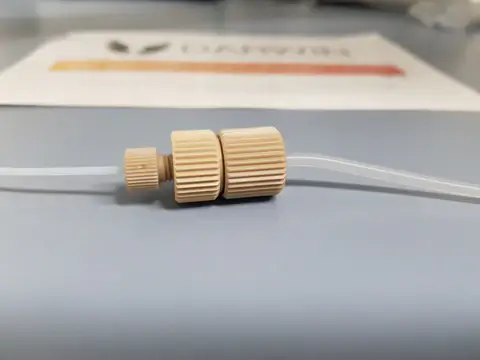
- To ease the interfacing between these two types of tubes, use tubing adapters if necessary to bridge size differences. For example, the Peristaltic Tubing Adapter for 1/16″ OD PTFE Tubing can be used to connect peristaltic tubing (with an inner diameter ranging from 1.2 mm to 3.8 mm) to standard 1/16" OD rigid tubing, ensuring a leak-free connection with minimal internal volume possible.
- Use Appropriate Connectors:
- Employ fittings and connectors designed for microfluidic applications, such as flangeless fittings, barbed fittings, ferrules, Luer locks, or quick-connect couplings.
- Ensure connectors provide a secure, leak-proof seal.
- Prepare the Tubing Ends:
- Cut both peristaltic and rigid tubing ends cleanly and evenly using a tubing cutter or a sharp blade.
- Smooth any rough edges on rigid tubing to prevent damage to the flexible tubing and ensure a tight fit.
- Assembly:
- Attach the rigid tubing to the fitting and ferrule (as can be seen on the left of the exploded view of the peristaltic tubing adapter used below).
- Slide the peristaltic tubing over the main conical connector, ensuring a snug fit.
- Screw the assembled parts together until secure.
- Ensure it is tight enough to prevent leaks but not so tight as to damage the tubing.
- Testing the Interface:
- Once assembled, test the connection by running fluid through the system.
- Check for leaks and ensure there is no excessive pressure drop across the interface.
- If leaks are detected, tighten the connections or apply additional sealing mechanisms such as PTFE tape.


Case of a Thin Peristaltic Tubing
When working with very small fluid volumes and delicate peristaltic pumps, you may encounter challenges when attempting to connect very thin peristaltic/soft-walled tubing to rigid tubing. The flexibility and fragility of the thin-walled tubing can make it difficult to create a secure and leak-proof connection with the more stable rigid tubing. However, using a needle can be an effective solution to bridge this gap and ensure a reliable interface. Below, you can find the detailed steps to easily and effectively interface these two types of tubing using a needle (stainless steel or other compatible material).
- Select Compatible Tubing Sizes (as explained above).
- Select the Right Needle Size:
- Choose a needle with an outer diameter (OD) that matches the inner diameter (ID) of the peristaltic tubing (check the syringe needle gauge table). Always use a needle with a larger outer diameter than the inner diameter of your tubing!
- Ensure the needle is made of a material compatible with your fluids and tubing materials.
- Prepare the Tubing Ends:
- Cut both peristaltic and rigid tubing ends cleanly and evenly using a tubing cutter or a sharp blade.
- Smooth any rough edges on rigid tubing to prevent damage to the flexible tubing and ensure a tight fit.
- Insert the needle:
- Carefully insert the needle into the end of the peristaltic tubing. The fit should be snug but not overly tight to avoid damaging the tubing.
- Push the needle in until it is securely seated inside the peristaltic tubing, ensuring no gaps are present.
- Connect to Rigid Tubing:
- Insert the free end of the needle into the rigid tubing or use an appropriate connector (such as a Luer lock or barbed fitting) to secure the connection.
- If using a connector, ensure it is designed to hold the needle and rigid tubing securely without leaks.
- Secure the Connection:
- If necessary, apply PTFE tape around the needle where it meets the peristaltic tubing to ensure a leak-proof seal.
- Use additional connectors or fittings to secure the needle and rigid tubing connection as needed.
- Testing the Interface:
- Run fluid through the assembled system to test the connection.
- Check for leaks and ensure there is no excessive pressure drop across the interface.
- If leaks are detected, tighten the connections or apply additional sealing mechanisms as needed.
Best Practices and Tips
💡 Consistent Material Selection: Choose tubing materials that are chemically compatible with your fluids to avoid degradation and leaks.
💡 Temperature Considerations: Be mindful of temperature ranges for both types of tubing. High temperatures can cause flexible tubing to become too soft and rigid tubing to expand or contract, potentially leading to leaks.
💡 Regular Maintenance: Inspect the connections regularly for signs of wear, especially in high-pressure or high-use applications, and replace tubing or connectors showing any signs of deterioration.
💡 Custom Solutions: For complex systems, consider custom-fabricated adapters or fittings designed specifically for your application. These can provide better reliability and performance than off-the-shelf components.
Conclusion
Interfacing peristaltic and rigid microfluidic tubing can be straightforward if approached methodically. By selecting compatible sizes, using the right connectors, and ensuring secure and leak-proof assembly, you can achieve a reliable and efficient fluidic interface. Whether you are working in a laboratory or an industrial setting, these steps will help you integrate different types of tubing for optimal performance.
Stay tuned for more insights, tutorials, and practical applications in our future posts. Until then, happy pumping !
📧 If you have any questions or feedback, please feel free to contact us at contact@darwin-microfluidics.com.


